I finished the build in late May 2012. Since then I have been tweaking and adjusting. Finding out what works and what doesn't. I was able to make it to the Car Craft show in Saint Paul Minnesota in 2012 and 2013. Received much positive feedback from the Mustang nation and even from those other guys.
Not sure where to go from here or how to get back into blogging what is already completed. How about this? You guys tell me what part of the build you would like to see and I will post descriptions, parts used and photos. So, contact me by either commenting on this blog or by using the contact information listed below.
Friday, September 27, 2013

Wednesday, September 18, 2013


Tuesday, February 7, 2012
TIGHT FIT


Tuesday, January 17, 2012
MONSTER SET BACK
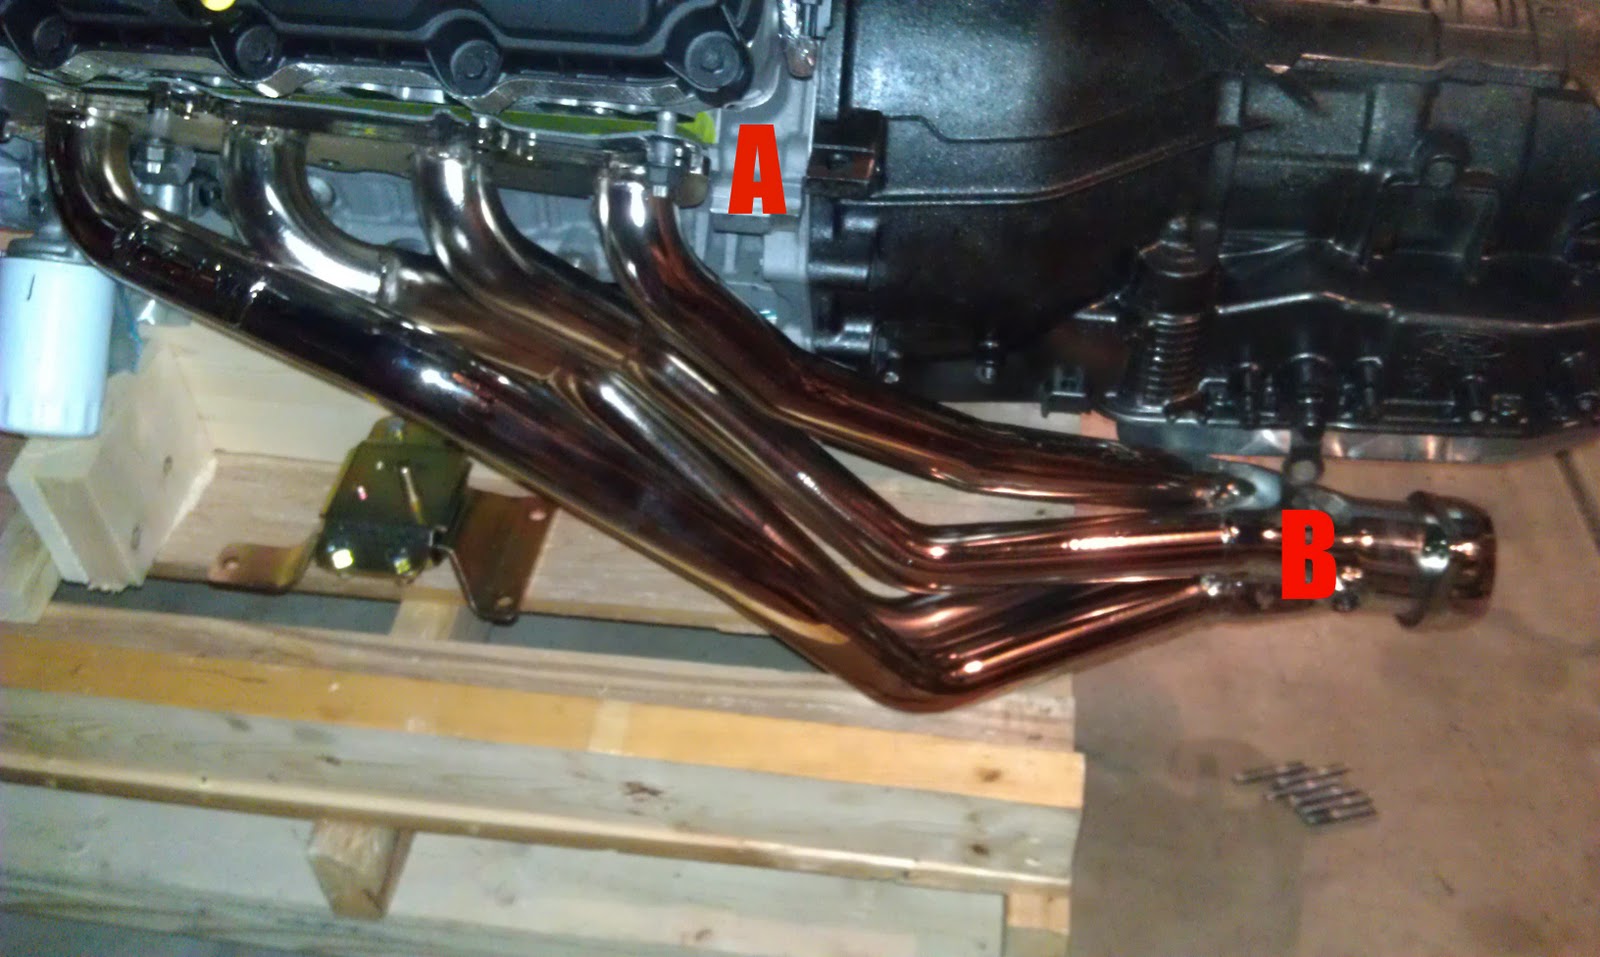

The BBK-1634 Coyote swap headers will not fit an automatic installation. As you can see from the photos the drivers side (A) won't even mount up to the head because of contact with the transmission (B) at the collector. The second photo shows the passenger side collector and O2 bung (red arrow) which can not be accessed due to proximity to the transmission pan. I have spoken with BBK and forwarded them pictures. Their engineers are looking into this. Hopefully they can come up with something (SOON).
NUTS AND BOLTS

 |
| DRIVERS SIDE MOUNT ON BACKWARDS |
In an effort to keep everyone informed about what works and what doesn't. The motor mounts and starter pictured here I purchased from Cjponyparts.com. The mounts are Prothane part # 6-504-BL and are for the 4.6. The starter is a PaPerformance again for the 4.6 part # STR1799. The bolts for the mounts are Ford part # F AB-175NG (need 4 if your planning on using a studded bolt on each side, otherwise 6). The studs are Ford part# F AW-91-BW (need 2 if you want a stud on each side for posible grounding points). The starter bolts are Ford part # W506510-S437M (need 3). All of these bolts are parts for the 4.6.
COYOTE BLING

This is the Road Runner Serpentine System from Turn Key Powertrain specifically made for the Coyote engine swap. The kit includes a power steering pump, A/C compressor, pulleys, brackets, belt tensioner, belt and all the spacers and hardware to complete the installation. The instructions are awesome! My kit came about 75% put together. Installation took about an hour and that included the alternator install. The alternator kit is a Ford racing kit that I also bought from Turn Key. The Road Runner Serpentine System is an amazing piece of engineering and it takes care of those "how to get power steering and A/C" questions. Check it out at http://www.turnkeyenginesupply.com/road-runner-serpentine-system/. I promise I didn't get a cut on this, I just think it's cool.
Sunday, January 15, 2012
SHIFTING GEARS

Here's a shot of the 4R70W from Performance Automatic bolted up. I bought the transmission as a coyote package from cjponyparts.com. It comes with everything you need including the torque converter, smart shift controller and wire harness. It came painted with a wrinkle black finish, which I considered a bonus. Talked to the guys at PA a couple of times for direction and they are very helpful and even acted like they cared about my project (refreshing).
Wednesday, January 11, 2012
GAS PEDAL AND HYDROBOOST
 |
| BEFORE CUT OUT |
 |
| AFTER CUT OUT |
 |
| HYDROBOOSTER |
 |
| PEDAL ALIGNMENT |
A couple of interesting developments. First, I was able to get the "fly by wire" gas pedal installed. The top photo shows the attaching bolts. Took me about 3 hours to install, but that was mostly measuring, creating templates and scratching my head time. Really wanted to make sure I had it right before I started drilling.
Second, the hydroboost I salvaged from a Mach 1 didn't quite install without drama (in fact it's still not installed). As you can see from the before and after photos the hole in the firewall had to be adjusted. Once that was done I learned that the pedal assembly from my '94 didn't match up with the 2003 hydroboost arm (same size hole, but the arm was too short and at the wrong angle). It seems that there are two different models. The first one runs from 1996 to 1998 and the second runs from 1999 to 2004. I don't know, but I'm guessing the first one would have matched up better with at least the pedal (the pedals are the same from 1994 to 1998). I purchased a salvaged '99 thru '04 brake pedal setup from mpsautosalvage on ebay. It should be here Monday the 16th. I will post an update once it's installed.
IN ALL IT'S GLORY

It's finally out of the create (kinda). Bought the engine more than a year ago and now the light of day. Since this is a automatic install (stop laughing please) and the motor comes setup for manual a couple things had to be done. The pilot bearing had to be removed and the flywheel had to be swapped for a flexplate. I called Ford Racing for the torque specs and was given 177 in/lbs plus 60 degrees. If I'm figuring correctly that converts to just over 14 ft/lbs plus 60 degrees. Think I'll make another call. More on the transmission in a later post. I also removed the headers to make room for the new BBK Coyote swap headers.
Wednesday, December 21, 2011
PAINT
 |
| PRIMED BAY |
 |
| FINAL PAINT |
Final paint and clearcoat has been completed. Looks ok for an amateur. Now not to scratch it!
Some parts are starting to arrive thanks to Cjponyparts.com (david@cjponyparts.com, David Newcomer Sales Rep.) having their year end blow out sale. I've been watching prices on these parts for a year now. This sale has saved me over 450 dollars. At some point I will list the parts and maybe include some pictures.
Saturday, November 26, 2011
OVERDUE UPDATE
Not much to report. I have been continuing my work on the engine compartment. Welding, grinding and soon plastic filler. The Patience and tedious work is paying off. I think I might be changing my mind about color and may go with silver (the exterior color).
One interesting note. I have been doing a lot of research on parts for this swap. The organizations that have been fantastic about getting right back to me and making sure all my questions have been answer are: Maximum Motorsports (kmember and suspension) www.maximummotorsports.com, BBK (headers) www.bbkperformance.com, J&M Products (kmember) www.hotpart.com, CJ Pony Parts (parts in general) www.cjponyparts.com and Late Model Restoration (parts in general) www.latemodelrestoration.com. Organizations that have not even responded to my request for information include: Kurgan Motorsports, Monster transmissions and Sean Hyland Motorsports.
One interesting note. I have been doing a lot of research on parts for this swap. The organizations that have been fantastic about getting right back to me and making sure all my questions have been answer are: Maximum Motorsports (kmember and suspension) www.maximummotorsports.com, BBK (headers) www.bbkperformance.com, J&M Products (kmember) www.hotpart.com, CJ Pony Parts (parts in general) www.cjponyparts.com and Late Model Restoration (parts in general) www.latemodelrestoration.com. Organizations that have not even responded to my request for information include: Kurgan Motorsports, Monster transmissions and Sean Hyland Motorsports.
Saturday, November 12, 2011
FUN WITH FABRICATION
 |
| LOWER APRON |
Monday, November 7, 2011
PLAYING WITH PANELS
 |
| LEFT FENDER APRON |
Saturday, October 29, 2011
TIME TO FILL SOME HOLES
 |
| HOLE-Y PONY |
Monday, October 24, 2011
WIRES, WIRES, WIRES
 |
| COMPLETE HARNESS |
 |
| TRASH I HOPE |
Monday, October 17, 2011
THE ENGINE IS OUT!
 |
| LIFTED CAR AND LEFT ENGINE ON CART |
 |
| ENGINE ON HOMEMADE CART |
I disconnected all wiring harnesses, fuel lines, hoses and brackets. Removed all front suspension components. Attached a brace that held the engine from the top and then removed the k-member. I built an engine removal cart that would fit between the runners on my four post lift. I lowered the car until the engine rested on the cart. Then I removed the engine brace and transmission jack. Now I just raised the car until it was free of the old 5.0, aode transmission and all of it's accessories. Check out the photo.
Friday, September 23, 2011
SOLD
 |
| ORIGINAL 5.0 |
Friday, September 16, 2011
NEW BLOG
Just built this blog to follow the engine swap in my 1994 Mustang. I bought the engine last October. I promised my wife if she let me buy it I would work on our house until this October. She agreed and my project begins in 4 to 6 short weeks. The original 302 and AODE transmission is up for sale. If you would like to see it running before you purchase it you have a few more weeks left.
Subscribe to:
Posts (Atom)